
MAPVIEW FOR SALESFORCE
Installation Guide: Enterprise and Above Editions
Getting Started: Admin Checklist
The following three steps are required to use the Mapview for Salesforce managed package. Make sure you have followed all of the steps outlined in this guide. If you still have questions contact us at appsupport@thecaseygroup.com.
Step 1: Install the Mapview Managed Package
Step 2: Clone the Mapview User Permission Sets
Step 3: Set Up Field Level Permissions
Step 4: Enable Notes
*The above list is a basic overview of the steps to be taken. Depending on your organization, you may have additional steps to take.
Step 1: Installation
Follow the steps below to install the Mapview for Salesforce managed package.
- Go to the AppExchange and search for Mapview.
- Click 'Get it Now'.
- Login to your Salesforce.com account or continue as a guest.
- Choose to install in your production or sandbox environment.
- Decide if you want to install for all users, specific profiles or admins only:
a. If you install for 'Admins Only' only you or your admin will have access to Mapview. If you want a specific user or user profile to have access to Mapview, you will have to give them access later via permission sets.
b. If you choose to 'Install for All Users' all Salesforce users will have access to Mapview. You will still be able to manage who is using Mapview via permission sets.
c. Lastly, if you decide to 'Install for Specific Profiles' you will see a screen like below where you can choose the user profile, such as 'standard user', who will have access to Mapview.
Step 2: Permission Sets
Now that you have installed the Mapview managed package please login to Salesforce and follow the steps below to clone the Mapview permission set.
- In the upper right corner choose 'Setup' from the dropdown.
- Then in the left sidebar under 'Administration Setup' open 'Manage Users' -> 'Permission Sets'.
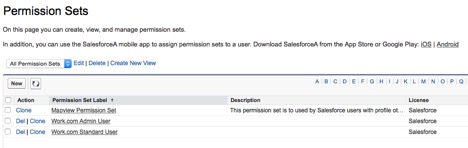
- Click on the 'Clone' link next to Mapview Permission Set. (The Mapview managed package bundles this permission set to simplify the setup process. The permission set is pre-configured to allow the access of necessary Apex and Visualforce pages)
- If preferred, you can change the permission set details such as a new label, api name or description, by clicking on the permission set and choosing 'Edit Properties'. Please do not edit any of the set permissions as it may disrupt the functionality of the app.
- When you are finished you will have two permission sets listed as shown below.
Step 3: Field Level Permissions
After you have set up the permission sets for Mapview you will need to set up field level accessibility for the task record. To do this please follow the steps below.
- Start by going to 'Security Controls' -> 'Field Accessibility' under the Administration Setup sidebar.
- Here you will see a list of records available to edit. Click on the 'Task' record.
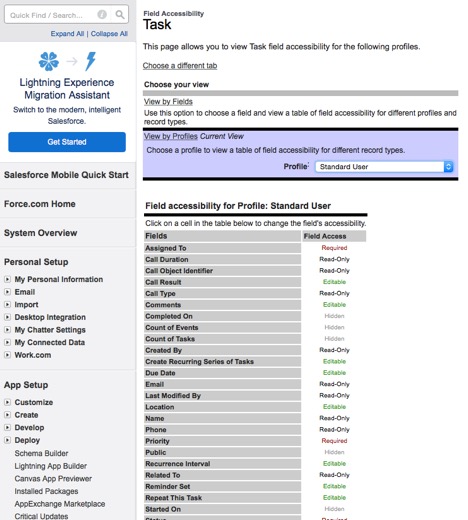
- Click on 'View by Profiles' and choose a profile to edit.
- Make sure 'Type', 'Location', 'Started On' and 'Completed On' are set to editable or read- only. If any of the above fields are set to 'Hidden', click on 'Hidden' and check the Field-Level security to either visible or read-only.
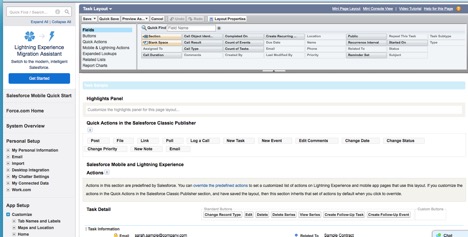
*The above mentioned fields also need to be added to the task page layout. If the fields are not added to the task page layout, under 'App Setup' go to 'Customize' -> 'Activities' -> 'Task Page Layout' and add the four mentioned fields to the page layout.
Step 4: Enable Notes
Notes must be enabled for Mapview to work. To enable notes, go to 'Setup' -> 'Notes' -> 'Notes Settings' and make sure the checkbox is selected.
Admin Tips: Managing Users
If you choose to 'Install for Admin Only' or 'Install for Specific Profiles', but want to allow a specific user to have access to Mapview you can follow the steps listed below. This is not a required step if you installed for all of the appropriate user profiles at installation.
- Under the Administration Setup, go to 'Manage Users' -> 'Users' and find the user you would like to have access to Mapview.
- Click on the user's name.
- Then go to 'Permission Set Assignments' and click 'Edit Assignments'.
- Click on both the Mapview permission sets and click 'Add' to assign them to this user. They should appear as the photo below.
- Click 'Save' to finish.
Admin Tips: Best Practices
- If hidden fields are made visible to API for a given user profile then the Salesforce admin should advise users of that profile to delete all imported views and reimport the data in the Mapview for Salesforce application.
- The Mapview for Salesforce app will retrieve at max 2000 records for a given view regardless of how many records are present for a view of an object in the customer’s Salesforce org.
- If a user changes the view definition of a public or private view then the Salesforce admin should notify users to remove all imported data of that view and reimport the view again.
- If a Salesforce record is changed using the edit functionality inside Mapview and the change makes that record qualified for another view then the change will not be effective inside Mapview for Salesforce until the user refreshes all views of the given object.
- To ensure data encryption at the device level, users must have a passcode set to enter their device.
Next Steps: Review the Admin Screen Guide
Thank you for using Mapview for Salesforce.
If you have any difficulties with installation please contact us: appsupport@thecaseygroup.com or call us 1.877.227.3947.